There was a problem in my code in my two js1k entries for this year (this and this). They weren’t showing the bee’s wings in latest Chrome - that I installed just today - and it was reported of having other problems in Firefox nightly. Note that by the time you read this, the organizer of js1k might have updated the code with my bug-fix and it might look right again.
So what was the problem? For js1k size coding, it is very common to try to save every single byte/character as possible, even if it results in ugly and/or unreadable code. One of the ways to do it is by placing code inside function calls without parameters, just to avoid the use an additional semicolon. So I had this:
a.fill( /* some code here */ );
With a being a Canvas 2D Context. So, why it is not working on the latest browsers right? The reason is simple: Canvas 2D Context spec is just a working draft, the draft changed and the new browsers are adapting to it.
Previous, the fill method had a single functionality, and no parameters. Now fill accepts an optional path parameter. Without parameters it works as previously, with parameters it doesn’t.
So, the bug-fix was easy; just to place the code inside fill outside it. I believe this problem will be happening in more than one js1k entries, as it is a very common size optimization.
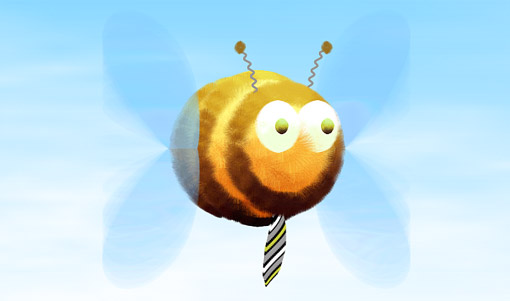
For the latest editon of Js1k contest (a contest to create something cool with only 1 kilobyte of Javascript), I’ve submitted an entry with a furry bee with springy antennae and my tie. Check it here.
I’ve been pushing the limits of what is possible to render with canvas 2d. As a result, it renders at decent speed only in Chrome with a very fast computer. In case you don’t have one, check out this video capture:
Rendering fur
For rendering the fur, I’ve used the same method as I previously used in the Christmas Tree I made for a previous js1k edition.The basic idea is to create sprites that represent handfuls of fur, and then draw those sprites/brushes thousands of times to create the body of the bee.
For this entry I’ve enhanced and reduced in code size the sprite generation method used in the Christmas Tree, also making it better suited for fur. Now it generates multiple sprites with different sizes and colors.
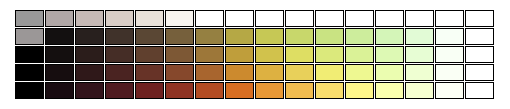
Color palette
Creating a nice color palette with the 1kb limitations of js1k is not an easy task. I wanted to have nice gradients with colors switching hue from red/orange/brown to yellow for the bee’s body, and it is very expensive in size to do it with RGB color space. Fortunately, browsers support the HSL space, that makes much easier the generation of nice gradients.
This piece of code is generating the palette, including the grays needed for the tie:
The spring in the antennae and the tie are rendered with a point cloud rendering method. It consists in representing 3d points in space as little dots (and/or pixels) in the screen. If they are dense enough in the screen, all space will be covered and it will look like a full surface.
Taking advantage of the same rendering code of the fur, and that I have little fur sprites available, I use them to render the point clouds without the need of additional code.
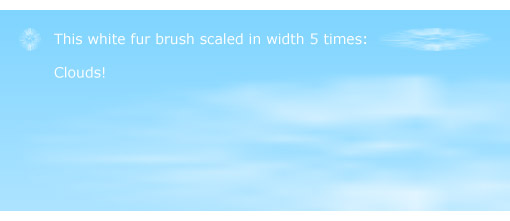
Clouds rendering
The image above is very descriptive of the process I’ve used for rendering the clouds. Again, the fur sprites are being reused to render clouds. I render 16 of those sprites with perspective transform, translating them in z, and recycling them when they are not visible anymore.
This results in the 3d cloudscape in the background. I have a gradient in the background from cyan to white. The clouds slowly move from top to the bottom, into the white area, and as they are white too, they seem to disappear. At this point is when I recycle them to create a new cloud.
Generating the sprite positions of the bee’s body
The body, stripes and eyes of the bee are non-uniformly scaled spheres. Fur sprites are drawn at multiple points in the surface of those spheres. So there is the need to generate those points in the surface of a sphere.
To make the fur look good, we need the points in the sphere to be well distributed. The ideal for render quality and rendering speed - due the need of less sprites - would be a Poisson disc sampling in a sphere, but it is too expensive, both in pre-computation time and in byte size. So I tried with the simpler uniform random sampling.
Generating uniform random sampling in a sphere surface, while it might sound simple, it is a world of its own with dozens or hundreds of different well known methods. I tried with a good amount of them, the shorter in byte size ones, and figured out the shorter is Normalize and Discard.
It consist in generating a random number between -1 and 1 for each x, y and z coordinate. That would set up uniform random point inside a cube with center at (0, 0, 0) and width=2. Then, we compute its vector magnitude, and discard the points for which magnitude is bigger than 1, that means only points inside a sphere radius 1 will remain. Finally, we normalize the vector (dividing x, y and z by its magnitude) and we project this way the point from the inside to the surface of the sphere.
It is both a very simple and short in size method. However, js1k is very restrictive in size, each byte counts, so I needed to shorten it. So I discarded the idea of a uniform random sampling and opted for just some random sampling.
The first try was just to remove the discarding, and so leaving just the Normalize method. That would just project points from a cube to the surface of the sphere. Unfortunately the distribution is awful as you can see in the interactive illustration above, and it was clearly visible in the fur.
So the next idea, and the one finally used was to perform 2 Euler rotations. As advantages it is shorter in code size, the distribution of points is near 20% denser in the low density areas than Normalize and it has only 2 high density points at the poles.
Finally, I will leave to the reader the option to analyze why Math.cos(i * y) is a rough and low quality approximation of Math.cos(random() * Math.PI * 2), where random is an LCG.
Wings with artistic motion blur
To make the wings looks good (as any very fast moving object), there is a strong need for motion blur.
A real honey bee flaps its wings during flight more than 200 times per second, that should be enough to make them look fully motion blurred and seemingly static with solar light conditions. Well, I’ve to say this is just what I suspect, I’ve not tried to look at a real one; I’ve a strong entomophobia, so I’m sorry, real bees are not my friends. But I like honey. Anyway :P. Oh, and I really hope bees to recover soon from the colony collapse disorder making them disappear so fast in the latest years. Nature (us included) would have a really hard impact without them, it is both amazing and somewhat scaring how such a little animal is so important for the stability of the whole system.
I was writing about motion blur and wings, right? Ok, so… motion blur, motion blur… ah, yes! If I were to represent wings as they are in reality, they would not look as having movement at all, because they would have a full motion blur. That would not be cool at all. So the next option is to represent them with my artistic vision of the motion blur they should have.
It was about adjusting the motion blur to cause sensation of movement, but a movement not so fast it is it is distracting or even annoying. Doing it required a huge amount of trial, mostly because of the size limitations of the compo. It ended pretty close to my artistic vision, so I’m very happy with them.
From a technical stand-point, they are multiple filled cubic bezier curves drawn on top of each other with a very low opacity.
Size optimizations
Furbee was compressed with jscrush, and so a lot of size optimizations were targeted to it. Jscrush is specially effective if you repeat as often as possible, so I used a lot of different reusable patterns for that purpose.
Using the less as possible different keywords is really important with Jscrush, so I limited myself to a very limited subset:
- Only for with no other conditional o looping structure
- Math functions: sin, cos, PI, abs (no random, generating pseudorandomness my own)
- Using fillRect to draw lines instead of moveTo, lineTo, stroke
- Creating gradient without canvas gradients; just reusing fillRect (used for sprite generation too)
I’m using the canvas context object as array to avoid the creation of a new variable and array and most of the common byte saving techniques, that are well described in this post from my good friend Claudio Cañete.
And finally, I use quantization for the bee’s body data. Well… to tell you the truth, I’m not even sure if quantization is the best word to describe it or not… but I’m going to call it like that. For the spheres that create body and eyes I have these parameters:
- Center x position of the sphere
- Center y
- Center z
- Brush size
- A flag to determine is the sphere is stripped or not
- Scale x
- Scale y
- Scale z
- Initial color for gradient
- Final color for gradient
- Gradient color dithering level
Eleven properties and a total of 6 spheres: body, stripes, 2 eyes and 2 pupils. So, 66 properties in total, thinking in clear numbers comma separated from 0 to 300, and averaging around 3 bytes per property, gives us a total of around 200 bytes of data.
A usual trick in js1k is to package data as string characters, that could reduce up to by half (depending on the data) the size, but in the case of that little amount of data as I had, the depackaging code was too big to compensate it.
So, I opted for quantization and lossy compression of it. As an example, suppose I have this code:
[33,11,66,121,22,77,88,55,132][i];
As all numbers are divisible by 11, I can safely do this:
[3,1,6,11,2,7,8,5,12][i]*11;
The size is lower, and the result is the same. Now, suppose I have instead of 132, that I have 133 in the last position:
[33,11,66,121,22,77,88,55,133][i];
Now, not all values are divisible by 11. But suppose that 133 value represents the width of the body sphere. Nobody will notice the difference between width 132 or 133, so this is the lossy compression part I’ve used. So, I end with the same quantization:
[3,1,6,11,2,7,8,5,12][i]*11;
I used this method carefully by hand tuning it to maintain the nice proportions and design of the bee while taking the less space as possible.
Rotation of the bee
The bee rotates with 2 degrees of freedom. Well… not. It just looks like that, but it is just a little trick. In fact it has a 1 degree of freedom for the y rotation axis and 1 degree of freedom for skew. For little angles, the skew is a reasonably good a approximation to rotation, so it does the trick. And it takes just 6 or 7 extra bytes.
Furbee inspector
My best friend Jan Carlo Mityorn has been really supportive during the development of this entry. He has been pushing me hard to make it better and better, and also he provided a lot of help testing it for performance on different computers. Thank you Jan!
So, he asked me for a bee where he could see the wireframe, rotate and play a bit with it. I’ve coded a special version of the bee without size limitations, that renders several times faster than the original so Jan Carlo is able to play in his old computer, so here it is:
JS1k is a really nice contest for coding tiny 1 kb Javascript programs and try to do something nice in that few available space. In its second edition, all the entries must be Christmas themed.
My contribution to the contest has been a 3D Christmas tree (note it doesn’t work in IE, and works slow in any current browser except in Chrome). I’m really lazy to write articles explaining how I do my visual effects, but in this case a lot of people are asking me to do it, so let’s try it in a visual way:
Finally, some size optimization tricks
I used several tricks to make the code fit in 1 kb. The most of them are the usual tricks for reducing Javascript code size, like renaming variables to single character names, removing white spaces, unnecesary semi-colons and so on.
It is also very common to assign functions you use more than one time to variables to avoid the repetition. For example, if I do r=Math.random;, I can call r() each time I need a random number.
I used some few math tricks, like using cos(angle+11) to approximate sin(angle) and modular arithmetic.
Finally, I’ve used some other tricks like reusing functions. A function does different things depending on if it received parameters or not. This saves some few bytes from writing again “function”.
Writing code for limited size competitions is mostly like a puzzle or logical game. In the most of the cases there is not a common rule to do it, but just thinking and trying different ways to achieve the same goal in less space. It is usually possible to fit 5 or 6 kb of normal code in 1 kb if you try it and don’t give up.
I’ve done this CSS/Javascript experiment as a tribute to The Beatles for its 50th anniversary.
Click on the lyrics!
It works on mostly all the browsers from IE5.5 and up. The best results will be shown if the system has Arial font installed on it and font-antialiasing is enabled. It will look good enough with Helvetica if Arial is not present, but probably not very good with other fonts.
This effect is a radial motion blur coded in Javascript. Since it uses the canvas element, it requires the latest browser versions and does not work in any current version of Internet Explorer.
The radial motion blur algorithm in this effect is a fast one that uses feedback for blur propagation. The most complex thing I did here was the speed optimization. Even if the effect is somewhat simple to code, it is not an easy task to make it fast enough to be realtime in Javascript for the current browsers and computers. It is working fast in the current versions of Safari and Chrome, not that fast, but enough in Firefox, and slow in Opera.
There are some interesting Javascript speed optimization methods on this. Please take a look of the source code if you are interested. If you want further explaination, please leave a comment and I will try to explain it in a new post.
Castellano
Este efecto es un difuminado radial de movimiento (me suena fatal esta traducción que he hecho, pero la verdad es que no estoy muy seguro de cómo podría llamarse en castellano) programado en Javascript. Usa el elemento canvas y por tanto requiere las últimas versiones de los navegadores. No funciona en Internet Explorer.
El algoritmo de difuminado que he usado para este efecto es uno rápido que usa realimentación para la propagación del difuminado. Lo más complejo fue la optimización de velocidad. Pese a que el efecto es relativamente simple, no es fácil conseguir que sea en tiempo real en Javascript en los ordenadores y browsers actuales. Está funcionando rápido en Safari y Chrome, suficiente en Firefox y lento en Opera.
Hay varias optimizaciones de velocidad para Javascript en esto. Si estáis interesados, por favor, mirad el código fuente. Si necesitáis que lo explique, dejad un comentario e intentaré explicarlo en un próximo post.
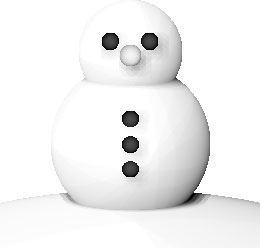
Today I’ve done a 3D snowman in Javascript. I decided to do something Christmas-related and also to try the canvas element and the direct pixels color-value control with createImageData and putImageData.
So, just before the web gets truly 3D with standards like WebGL, I thought it would be cool to try the oldschool cpu software rendering in Javascript. Would it be possible? Could I even do some kind of lightning? The answer is yes: but it required a lot of tricks and even with those, a fast computer to render at a reasonable framerate. Javascript continues being very slow for things like this one.
What I did: parallel sphere raycasting with some modifyed/simplified SSAO (screen space ambient occlussion).
Just a little note: This is a one-file effect, there are no textures or whatever, and everthing fits in only 4kb.
UPDATE: Thanks so much to p01 - an expert javascript coder and part of the Opera browser team - for suggesting the change from createImageData(widht, height) to getImageData(0, 0, width, height). Now it works in more versions of browsers.
Castellano
Ante todo: ¡Feliz Navidad y próspero año nuevo!
Hoy he hecho este muñeco de nieve en 3D con Javascript. Decidí hacer algo navideño y también probar el elemento canvas (aún no había hecho nada porque suelo inclinarme más por efectos totalmente crossbrowser) y el manejo de color de píxeles directo que proporcionan createImageData y putImageData.
Antes de que la web se vuelva totalmente 3D gracias a futuros estándares como WebGL, pensé que estaría bien intentar algo de renderizado a la antigua usanza, usando la cpu en Javascript. ¿Sería posible? ¿Podría agregar algún tipo de iluminación? La respuesta es sí: pero ha requerido bastantes trucos y aún así necesita un ordenador bastante potente para mostrar suficientes imágenes por segundo. Javascript sigue siendo un poco lento para estos fines.
Lo que hice: trazado de rayos no recursivo para esferas e iluminación SSAO (Oclusión ambiental aproximada basada en el buffer de profundidad), modificada/simplicada para mi efecto.
Una pequeña nota: este efecto está contenido al completo en un único fichero html, no hay texturas ni similar, y todo ocupa sólo 4kb.
Today I’ve done this little Javascript experiment that makes an Apple-style reflection on html text - without images. It is extremely simple: it just cuts the text in 1px horizontal lines and place these in inverse/reflected order.
The “Write here!” is an input field, so you can click on it, change the text and see how the effect dynamically changes the reflection.
It works in IE 8, 7, 6 and - magically - in 5.5. It have been tested and it is working also in Firefox 3.5, Firefox 2, Konqueror 3, Opera 9, Safari 3 and Chrome 4.
Note: please remember that this is just a fun experiment and not thought to be useful in any way. If you are going to use it in your website, think that it is probably going to cause accessibility problems on javascript enabled text-only, text-to-voice and text-to-braille browsers, so I can’t recommend its use on any serious/non-experimental websites.
Castellano
Hoy he realizado este pequeño experimento con Javascript que crea reflejo sobre texto html al estilo Apple (sin usar imágenes). El funcionamiento es muy simple: el texto se corta a líneas horizontales de 1 pixel y las pongo en orden inverso/reflejado.
Donde pone “Write here!” (traducido: ¡Escribe aquí!) hay realmente un campo de texto. Podéis pinchar, cambiar dicho texto y ver cómo el efecto de reflejo cambia dinámicamente mientras se escribe. El botón de “Shake it!” menea</e el texto reflejado.
Funciona en todos los navegadores que he podido probar, incluyendo asombrosamente (¿o mágicamente?) el Internet Explorer 5.5.
Nota: este efecto es sólo un experimento por diversión, y no se debería tomar como algo útil de ninguna forma. Si alguien se piensa usarlo en alguna página, que recuerde que puede causar problemas graves de accesibilidad para personas que usen navegadores con javascript en modo de sólo texto, lectores de voz de páginas web y lectores web braille. Por tanto, no puedo recomendar su uso en prácticamente ninguna web, a excepción de webs experimentales y poco más.
La Cruz de Alineación es la primera de varias pequeñas utilidades javascript embebibles al navegador desde la barra de Vínculos/Marcadores (que llamaré microutilidades) para desarrolladores/diseñadores web que pienso crear e ir publicando en este blog.
En este caso se trata de una cruz que sigue el movimiento del ratón desde cualquier página web. Es de utilidad para comprobar la correcta alineación de los objetos en una web en desarrollo.
Para adaptarse a los diferentes colores de fondo, la cruz se muestra en 2 colores; al primer click en azul, al segundo click en gris claro. Por último, el tercer click oculta la cruz.
Puede agregar a Vínculos/Marcadores la Cruz de Alineación aquí: cruz